
What Not To Do..
Before we discuss what to do it seems important to describe what “Not” to do. Do not take your pup to a gun range and tie them up to expose them to gunfire. This is a very poor method that has a high risk of producing subpar results. Sure, some pups have been exposed this way and turned out fine. There have also been well bred pups with a bright future in the field that were ruined using such a method. Why take such a risk with a dog you have spent hard earned money on that you have such high hopes for?
Gunshot = Something Pleasurable
The important thing to remember is to pair (or associate) the report of the gun with something that is pleasurable and reinforcing. There is nothing more exciting to a v-dog/bird dog than…birds or live game. This is why I prefer to use live shackled birds for the gun breaking of our dogs. I can’t tell you how many pups I have conditioned to gunfire to date, but not one has had an issue using the method I will outline in this post. Before I ever start using birds in the field, however, I typically will use a couple of short 2×4 boards and clap them together at feeding time. After clapping the boards together a time or two, the pup is praised as they come and eat their food. It doesn’t take to many days of repeating this exercise before the clap of the board brings the pup(s) running, knowing that it is time to eat. When this happens, the loud bang has been paired with food, something pleasurable. The sound of the boards clapping together is not nearly as loud as the report of a .22 blank, but this lays the foundation that loud noises are nothing to be feared. We typically gather up our litters using this method at feeding time to get this process started for our puppy buyers here at Cross Timber Gundogs.
Age, Tools, and Method
Assuming your pup is not showing any signs of fear related to the exercise discussed above, using 2×4’s at feeding time, you are ready to begin the gun conditioning process. Many folks ask at what age their pup should be before they begin. Usually, we start using a .22 blank pistol when the pup is between 4-5 months old and often are able to step up to the 20 gauge by 5-6 months. It does not hurt if you wait until your pup is a little older than the ages outlined here to start this process if you feel your dog is on the sensitive side or if you simply want to do so. I have started gun breaking dogs quite a bit older with no ill effect due to an older age. There are benefits, however, of getting this behind you when the pup is 6 months old or so. Because once behind you, the pup can be taken hunting or even have a few planted quail or chukar shot over them while training.
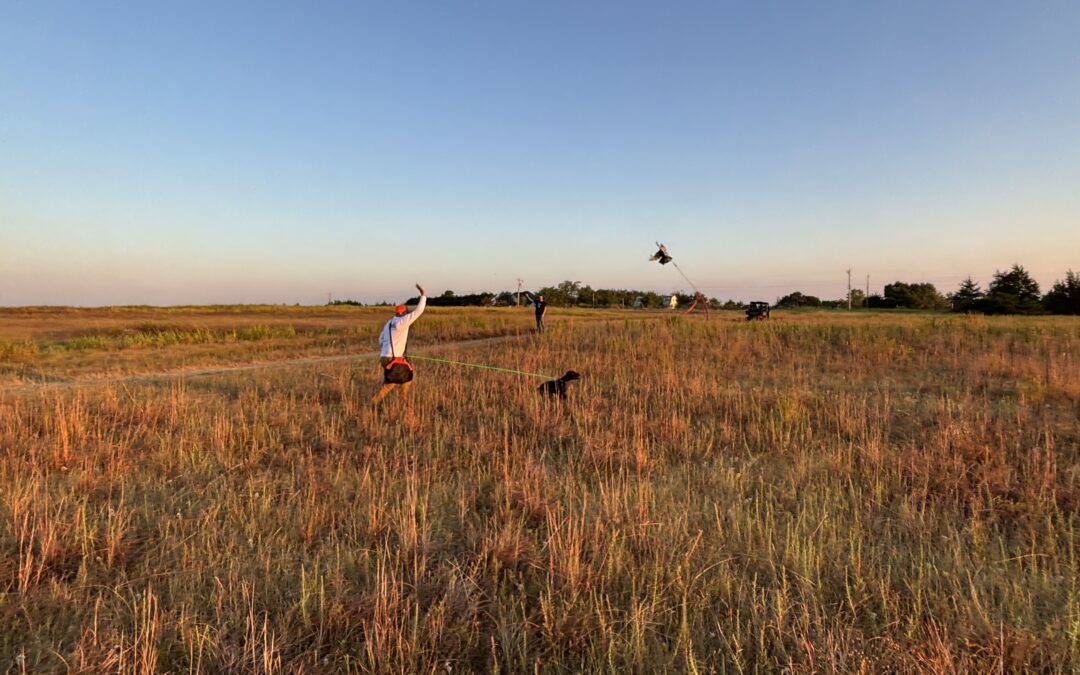
Let’s get started discussing how to go about things. Start by “pairing” the gun shot with a live, cropped-wing or shackled pigeon. A dead frozen/defrosted bird will work. However, I much prefer a live bird to a dead one as the flapping of the live bird is more exciting to most pups, which increases the likelihood that they will totally ignore the ghostwriter hausarbeit. I use a 12-18 inch piece of old garden hose. (Note: I like making these with a red hose or some other unnatural color so it is easily seen by myself in the grass.) I put a small hole in one end of the hose. I then tie a piece of parachute chord to the hose. The chord is usually about a foot long or so. I tie a slip knot in the loose end of the chord and place it on the pigeon’s leg. This doesn’t hurt the pigeon and simply ensures that the pigeon will flutter to the ground about 15-20 yards from me. I might suggest that you test the pigeon a time or two in the field prior to starting to ensure that the weight of the hose is adequate enough to bring the pigeon to the ground fairly quickly. I have miscalculated a time or two in the past and had to rescue my pigeon from a tree on neighboring land 200-300 yards away! Valuable training time wasted…
Anyways, go to a large field along with a helper/friend. Place your helper at a distance of about 75-100 yards away from you with a blank .22 pistol. You will have your pup check chorded in one hand. You will have a shackled pigeon in the other hand. Get your dog excited by showing the bird to the pup, and when your pup’s total attention is on the bird toss it so that it flutters 20 yards away and lands. At the moment you release the bird allow your pup to move forward by allowing the 20-30 ft check chord to glide through your hand as you move forward as well. With the young pup in hot pursuit, and about half way to the bird, raise your hand to signal for the gunner to shoot. Stop the dog with the leash/check chord a few feet from the bird and praise your pup profusely as you walk up the check chord, hand over hand, approaching your pup. Pick up the shackled bird while holding the pup back using the check chord in your other hand. Have your helper/gunner come in 10-15 yards (to about 60-75 yards away) and repeat the exercise. Bring your gunner in about 10 yards each shot, going through the same process each time, until your helper/gunner is within 20-30 yards or so from the pup on the last shot. Be satisfied with the success of the moment. No need to rush things.
The next time out (either the next day or a week or so later) repeat exactly what we discussed above (again using a .22 blank). If your pup continues to show no issues, and doesn’t acknowledge the gun fire, then repeat the whole exercise using a 20 gauge. Have your helper move back out to 75-100 yards and again work in some with each shot. Ideally, the pup will chase the flying/fluttering bird and not even acknowledge the report of the 20 gauge. If at any point the dog shows fear or overly acknowledges the gunfire stop the exercise for the day and start from a further distance the next time out. Most dogs do well throughout and move through this without issue, but every dog is different.
Next, and probably on the third and/or fourth session, I like to use homing pigeons in remote launchers. After putting out the launchers loaded with pigeons, I will bring the pup up from a crosswind for them to point the birds. Assuming they point, I walk up to the side of the pup and I launch the bird. Once the bird is launched, I will throw a frozen/defrosted quail from my hunting vest in the direction that the bird flies (because that is the way the pup will be looking) and shoot a .22 blank in the air and allow the pup to retrieve the fallen bird. If they do not point during this exercise, I just launch the bird and there is no tossed bird and no gunfire, and I simply walk towards the next launcher loaded with a bird. I want them to learn that when they point the bird, they get a retrieve.
Note: I toss a defrosted quail for two reasons. 1. I don’t like shooting my homing pigeons as they are valuable for all aspects of training, and 2. I “never miss the bird,” guaranteeing the pup will have something to retrieve, which will enhance the association I am attempting to make, that “boom” equals “bird.”
Always Remain Positive
Throughout this entire process you don’t really want your pup to catch a live bird, but, as I have stated in past V-Dog Blog posts, if your pup does catch one, I suggest that you offer nothing but positive reinforcement and praise. You want birds to always be associated with fun, and a good time. Simply praise your ghostwriter kosten and take the bird from them by gently pinching their top lips into their teeth, if need be, while taking the bird from their mouth with your other hand.
Once you have went through the process above you can now use a 20 gauge to shoot a few planted quail or chukar for your developing V-dog. Just try not to shoot directly over the pup the first few times. Also, I suggest you have your pup drag a short leash or check chord to ensure that you can ensure a clean retrieve.
Conclusion
I have outlined the method for conditioning puppies to gunfire that Cross Timber Gundogs has used for years. This is one method that has stood the test of time and has worked well for us working with many young dogs of various breeds. I hope that by outlining exactly how I do things it has reduced any anxiety you may have at the thought of “messing up your pup” as you embark on gun conditioning your dog. Good luck working with your new pup, and most importantly, remember to have fun and take a few pictures! Time goes to fast…